BMW E30 5-lug Swap / Conversion
Focus: E36 M3 Front, with Z3 1.9L or 318ti Rear
Application: 1986 and up E30UNDER CONSTRUCTION!!
Incoming: more photos, updated/corrected details, part numbers, etc.///Introduction
Welcome. The following is a guide to converting a1990 (or any U.S. 1986+) BMW E30 from 4-lug (4x100mm bolt pattern) to 5-lug (5x120mm bolt pattern). This swap/conversion is called many things: E30 4-lug to 5-lug; E30 4x100 to 5x120; E36 M3 and Z3 / 318ti swap; E30 5-lug conversion; E30 5-lug swap; E30 5-stud conversion; E30 5-stud swap; simply E30 5-lug; etc.
You are likely here because you need/want: bigger brakes; increased wheel selection; or a new project to feed the need. This site is intended to be used as a reliable reference, and as such, information here is subject to updates and changes. The ultimate goal is to provide accurate information, as many part numbers as possible, and clear photos to chronicle the 5-lug swap.
The E30 used in this conversion is a late U.S. model: 1990 325is. This information should apply to most U.S. E30s made after 1985 (as they share the same rear trailing arm assembly specifications).
This information is based on an E30 with lowering springs installed. Without lowering the vehicle, front camber measurements will likely be undesireable. The methods documented and illustrated below, on my personal car, have yielded alignment measurements that are well within factory specifications for both camber and caster, and even rear toe!
When "complete assemblies" or similar terms are used below, it is assumed all relevant items are included that would be known to a fairly competent, mechanically inclined individual; for example, "brakes" would include: calipers, caliper carriers, guide pins, brake pads, brake wear sensors, brake lines, nuts and bolts, anti-rattle springs, etc.
///Methods Available for FRONT
METHOD 1: COMPLETE E30 M3 FRONT ASSEMBLY
Simply bolt on the complete strut and brake assembly from top to bottom (from the strut mounts through to the brakes, etc.). This method is indeed the most costly, the most difficult for which to obtain parts, and the most modest upgrade to the front brakes. This also maintains the E30's original required wheel offset.
METHOD 2: HYBRID of E36 M3 and E30 NON-M3 PARTS
E36 M3 and the E30 non-m3 (e.g. 325is) share the same spring diameter! Essentially, the complete E36 M3 front assembly is only altered by using E30 non-M3 strut mounts and springs. Additionally, E30 Bilstein Sport strut inserts are valved the same as E36 M3 Bilstein Sport struts. This setup requires 17" wheels (or very open 16" wheels) to clear the front brakes. The use of 1996 (and later) M3 spindles/steering knuckles in combination with 1996 (and later) control arms (and their offset bushings) is required for the front wheels to be closer to the center of the front wheel well AND the alignment to be within factory caster specifications of the E30.
The front ABS sensors from the E36 M3 can be spliced into the E30 system. The E30 harness has a 2-wire system, whereas the E36 M3 has a 3-wire system. Simply match the colors and leave the third wire color disconnected.
This setup allows for E36/E46 fitment wheels (approximately et41 @ 7.5" width).
METHOD 3: HYBRID of "MZ3" / "Z3M" / "M Roadster" / "M coupe" and E30 NON-M3 PARTS
This should be an exact copy of E36 M3 with regards to the FRONT suspension/brakes and wheel fitment.
///Methods Available for REAR
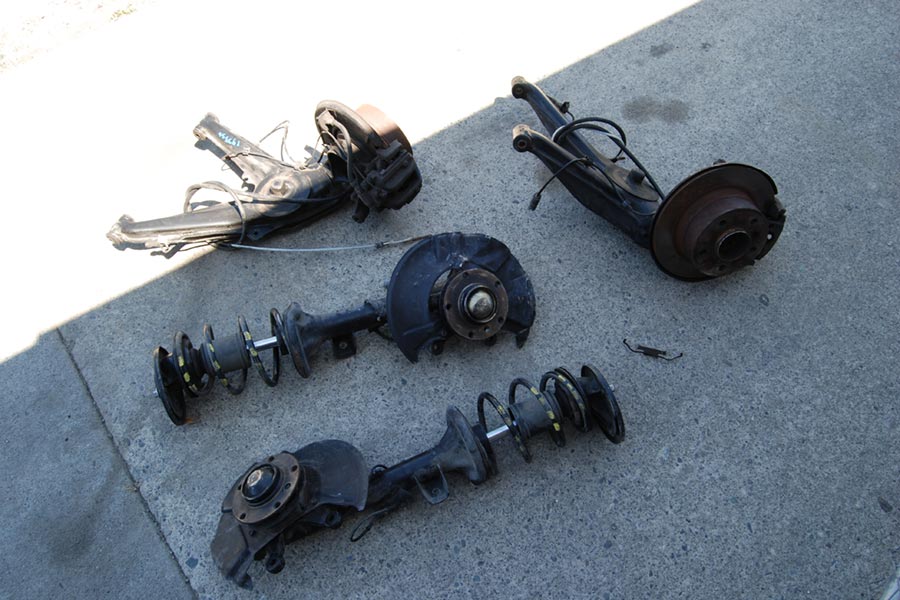
METHOD 1: E30 M3 - HUBS/BRAKES or COMPLETE TRAILING ARM ASSEMBLY
Simply bolt on the complete trailing arm assembly, or just the wheel hubs and brakes. It's a partial graft or a full replacement, with the same results either way. This method is likely the most costly and the most difficult for which to obtain parts. This also maintains the original required wheel offset.
This method allows the original rear E30 ABS sensors to remain untouched.
Method 2: COMPLETE E36 318ti TRAILING ARM ASSEMBLY
The trailing arms, brakes (calipers, discs, heat/dust shields, etc.), and hubs as one complete assembly will bolt right on to the E30 subframe. This setup allows for E36/E46 fitment wheels (approximately et41 @ 7.5" width). NOTE: this method yields about 5mm more fender clearance if used with the same wheels as Method 2, so a SLIGHTLY lower offset wheel may be used.
This method requires moderate spacing of the E30 ABS sensors so that they do not come in contact with the ABS pulse ring on the axle shafts.
This method uses a SLIGHTLY smaller wheel bearing design than the E30.
METHOD 3: COMPLETE Z3 1.9L (4 cylinder) TRAILING ARM ASSEMBLY
The trailing arms, brakes (calipers, discs, heat/dust shields, etc.), and hubs as one complete assembly will bolt right on to the E30 subframe. This setup allows for E36/E46 fitment wheels (approximately et41 @ 7.5" width).
This method requires moderate spacing of the E30 ABS sensors so that they do not come in contact with the ABS pulse ring on the axle shafts.
This method uses a SLIGHTLY smaller wheel bearing design than the E30.
METHOD 4: COMPLETE "MZ3" / "Z3M" / "M Roadster" / "M coupe" TRAILING ARM ASSEMBLY WITH AXLE SHAFTS
This is arguably the biggest, badest, and best rear setup. The MZ3 (etc.) has rear brakes identical in size to E36 M3's rear brakes (same pads and discs), but a rear trailing arm setup that mimics the E30's suspension. These brakes naturally match the best with the E36 M3 front brakes. This method also requires the use of the larger, longer MZ3 axle shafts due to the wider trailing arms. The MZ3 output flanges are also required to attach the MZ3 axle shafts to the E30 differential.
This method requires moderate spacing of the E30 ABS sensors so that they do not come in contact with the ABS pulse ring on the axle shafts.
Why does this work? MZ3 have wider rear trailing arms than all Z3 models, but retain a shallower hub. Due to this mix, this setup allows for E36/E46 fitment wheels (approximately et41 @ 7.5" width).
METHOD 5: Z3 (6 cylinder) HUBS AND BRAKES ONLY
Simply install the rear hub and discs from any 2.5L, 2.8L, or 3.0L (6 cylinder) Z3. Bolt on ANY E36 (non-M) or ANY Z3 (non-M) rear brake calipers and carrier brackets. If using E36 calipers, they need to be swapped (right to left and left to right) in order for the brake lines to fit properly. This setup allows for E36/E46 fitment wheels (approximately et41 @ 7.5" width).
This method allows the original rear E30 ABS sensors to remain untouched.
Why does this work? Z3 (6-cylinder) rear hubs are much wider (stick out further) than E30 rear hubs (hence higher wheel offset requirement), but they fit with the stock E30 axle shaft lengths and wheel bearings!
///My Parts List (using METHOD 2 for FRONT and REAR from above)
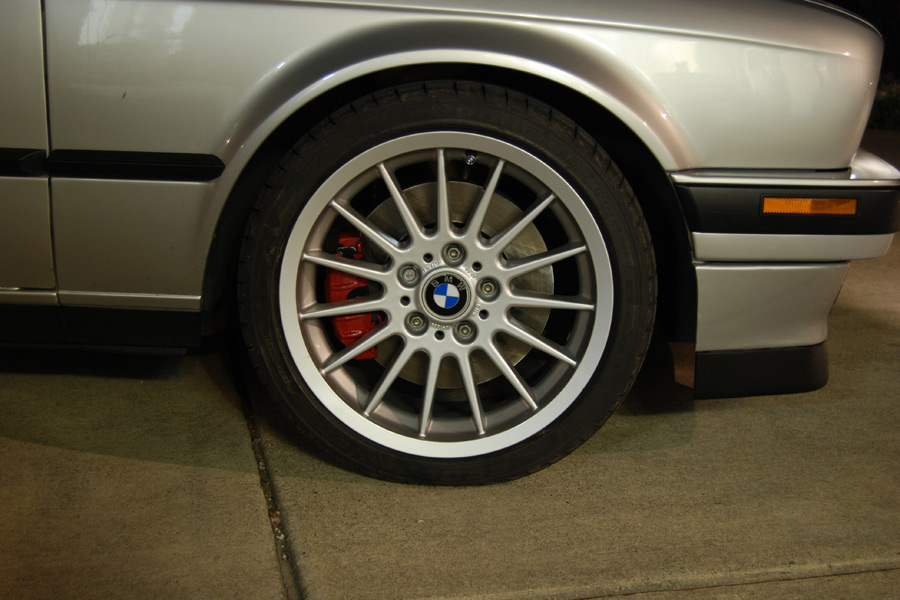
WHEELS:
-BMW wheels, Radial Spoke Style 32, 17x7.5 et41 (36111091869)
-BMW center caps (36131095361)
-215/40/ZR17 BFGoodrich G-Force Sport tires
SUSPENSION:
-'97 E36 M3 complete front strut and brake aseemblies (USED)
-'97 318ti complete rear trailing arm and brake assemblies (USED)
-Ireland Engineering E30/Z3 rear camber/toe adjustments kits (02adjrt + e30adjsf)
-I.E. E30/Z3 rear trailing arm bushings (black), soft (street) polyurethane (e30rearbush)
-I.E. E30 rear sub-frame bushings (green), polyurethane (e30urethanerear)
-'97 E36 M3 struts, Bilstein Sport (VE3-A585-H0 + VE3-A586-H0)
-'97 E36 M3 control arms with ball joints (31122228461 + 31122228462)
-'90 E30 Cabriolet rear shock mounts (33521128819)
-'90 E30 rear axle nut lock plates (33411124945)
BRAKES
-'97 E36 M3 front brake discs, Brembo (34112227171 + 34112227172)
-'97 E36 M3 front brake pads, Hawk HPS
-'97 E36 M3 front brake anti-rattle springs (34112227670)
-'97 E36 M3 right front brake backing plate
-'97 E36 318ti rear brake discs (USED) (34216758552)
-'97 E36 / Z3 (any non-M) rear brake pads, Pagid OEM pads (34216761239)
-'90 E30 parking brake cables (34411158421)
OTHER: previously installed on the E30, relevant to this swap
-E30 H&R Sport lowering springs (1.3" to 1.5" drop)
-E30 Bilstein Sport rear shock absorbers
-E30 offset control arm bushings, polyurethane (formerly Bavarian Autosport, currently Power Flex)
-E30 strut bearing caps/mounts
-E30 Eibach sway-bar kit, 22mm front + 19mm rear, stock links
-E30 I.E. rear polyurethane sway-bar bushings (see next item)
-E30 I.E. rear sway-bar reinforcement kit (bolts through trunk floor)
-triangular-style rear sway-bar mount reinforcements (welded to trailing arms)
SPECIAL:
-22mm Craftsman socket, ground down to fit into front strut mount to tighten top strut nut.
///My 5-lug Swap Story
CLEAN-UP AND PREP WORK:
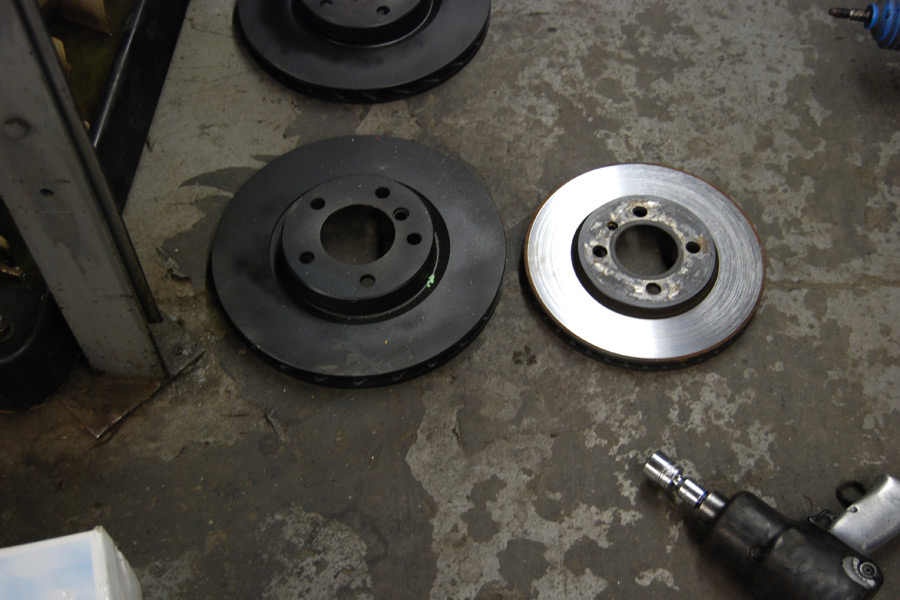
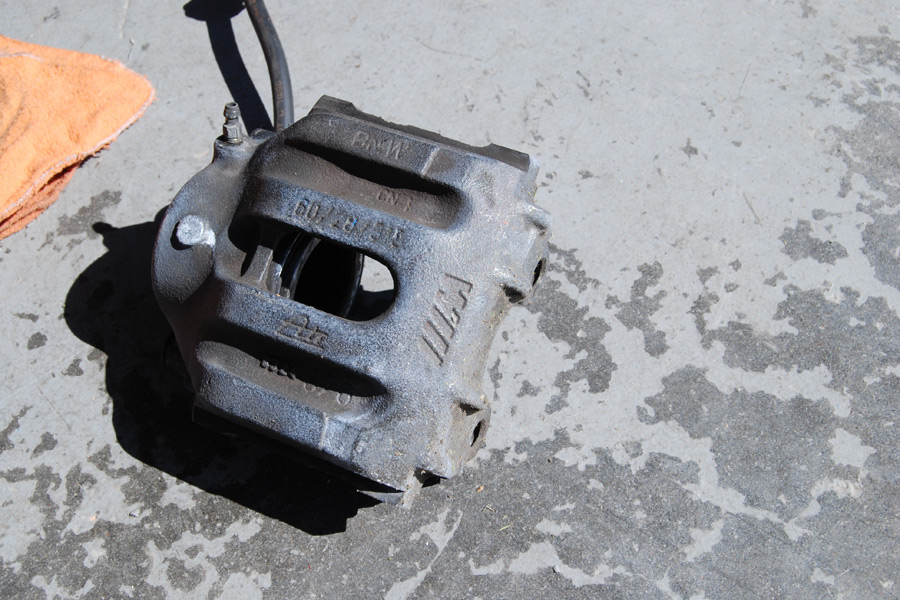
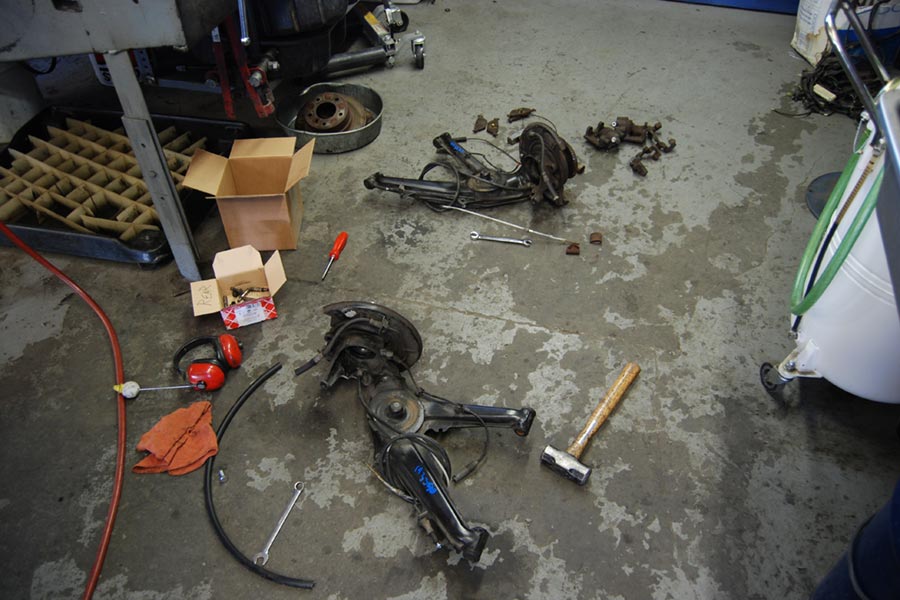
I started on the brakes and rear trailing arms. I took the discs off the E36 318ti rear assemblies and cleaned them up with some emery cloth and carburetor cleaner. The discs had a bit of rust on the non-braking surfaces, so I just went over them briefly. The discs (both the used rears and new fronts) were then painted with some high heat, low gloss black paint. I hate rusty discs or ones with failing plating that you can see behind the wheels. I then cleaned up all the calipers and mounting brackets (caliper carriers) in the cleaning tank with a steel brush and some elbow grease. They came out pretty nice. I hit them with cleaner, followed by red caliper paint, and let them sit for a few days.


SUB-FRAME AND TRAILING ARMS, ETC.:
Using some random pulling tools, hammers, and chisels I found in the shop, I managed to pull out the old trailing arm bushings from the 318ti trailing arms. The new urethane ones from Ireland Engineering went almost all the way in with moderate tapping. I used a long nut and bolt and big washer setup to really pull them and the steel shafts into place. I then disassembled, cleaned, greased, and reassembled the parking brake hardware on the 318ti arms. While I was in there, I also put in new E30 parking brake cables. To remove the old cable you have to pull out the rear piece of the E30 center console to get to the mounting hardware… it's really easy and self-explanatory. The new cables simply press into the tubes under the car; from there they go into the back of the rear brake assembly. The new cables were a bit tight going into the back of the brake assembly, so I had to sand them and make them press in all the way with a little hammer-and-punch action. When working with the parking brake hardware, I was careful not to lose the little pin that holds the cable onto the hinge piece that pushes the shoes outward. I also took the opportunity to beef up with rear sway-bar mounting tabs with my amateur welding skills. I just cut some triangles out of some steel using some other tabs as a template.
After all the cleaning and painting and such were done, we started pulling the rear of my car apart. Off came the wheels. I disconnected the parking brake from inside the car (on the handle itself) so the old arms could come off with the cables still attached. The sway-bars disconnected easily. The brake lines came apart… messy but easy; I plugged them with plastic bolts or fuel hose with a screw in the end to stop the leaking. The shocks unbolted and let things fully drop. The differential came off after removing the exhaust and axles (lots of allens and a brass drift to punch the axles out after taking the axle nuts off). The differential has four bolts connected to the drive shaft, four bolts on the top of it, and one fat bolt through the differential bushing/mount. The sub-frame and arms came off next after taking off the rocker panel allen bolts and the huge nuts located just behind them, underneath the car.
Again, with random pullers and chisels and such, I was able to get the old sub-frame bushings out. The new Ireland Engineering hyper green urethane bushings just slide in firmly (a rubber mallet may be your friend). Since I am using their camber and toe weld-on kits, I had to chop part of the new green bushings' lips off to make room for the hardware and wrenches.
The real painful part of the sub-frame work was marking and slotting the holes for the bolts to slide in for the camber and toe adjustment. I used the top of the sub-frame bushing hole as my "level" spot and marked everything accordingly from there. The outer trailing arm mounts were slotted for toe adjustment and the inner ones were slotted for camber adjustment. I set my original outer holes (now for toe) to be in the center of my sliding area. I set my original inner holes (now for camber) lower but not at the bottom of the slotted area, so that I can add just a little more camber still, or remove a lot. In short, the toe can go equally either way and the camber can go in just a bit more or out a lot (having my alignment done will set these for certain). Grinding the slots into the sub-frame brackets was real torture and required many different tools from files to metal saws to a Dremel. Once the slots were done on the brackets, I cleaned it all up enough to weld on the slider hardware (which is what I used to stencil the slots). They came out decent for my first real welding project; they are nothing to be too proud of, but they should hold. I hit the fresh metal with some SEM paint.
With some huge pliers and grease, we got the 318ti arms onto my sub-frame and got all the hardware on for the camber/toe adjusters. We slowly put everything back onto the car and things started to take shape. A tranny hoist can be your friend as well. I also replaced the rear shock mounts with another set of E30 cabriolet mounts since I had everything all apart; my old ones (which were already cabby mounts) had about 50,000 miles on them and you could see the wear and cracks.
REAR MISCELLANEOUS:
We lubed the brake hardware with anti-seize compound and special brake grease for the slider pins (that go into the rubber sleeves) on the calipers. All the bolts got torqued properly from the axles to the sub-frame to the wheel lugs. Ideally, you are supposed to tighten the sway-bar bolts and the shock bolts when the car is on the ground, so we did. We bled the rear brakes and took a test drive. I was stoked to say the least.
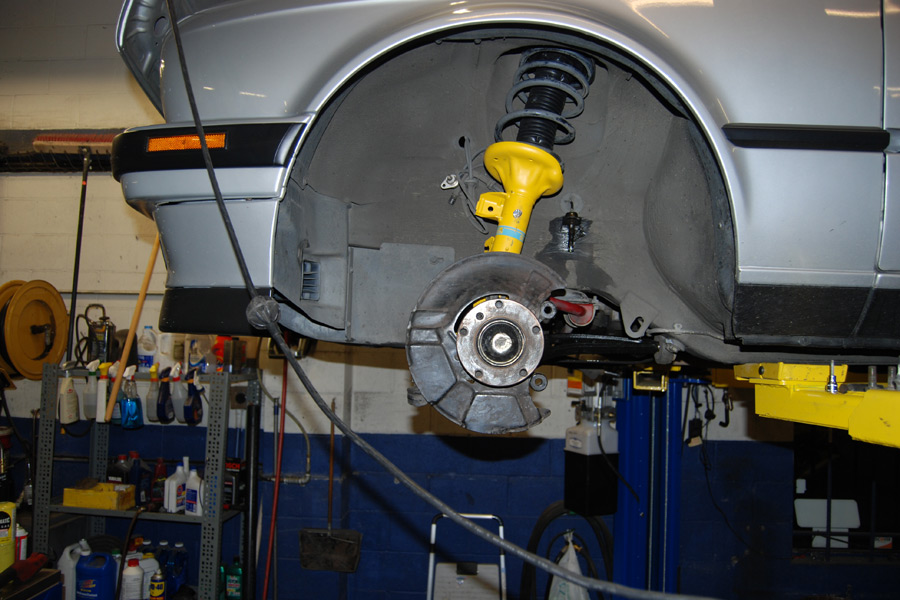
FRONT SUSPENSION:
Next up was the front. Late one night I started ripping into the front end. I got new Bilstein Sport front struts and bolted the used steering knuckle and brake assemblies to the bottom of the new struts. I had to get another (new) backing plate for the passenger side because the one that came on the assembly looked like a plastic frisbee that a dog had chewed on. To replace that, you have to pop off the wheel bearing assembly… impact gun and chisel are pretty much required for that huge lock nut.
Using a spring compressor, I yanked apart the old E30 strut assemblies and saved the H&R springs, the stock E30 bearing caps, the spring pads, etc. All of that was then mounted onto the new E36 M3 struts. The shafts coming out of the E36 struts are the same diameter as the E30 ones, but the nut on top is now a 22mm, compared to the old 19mm. The only hitch I had here was that I had to grind out one washer per side to fit over the shafts' threads. Also, my bearing caps must have been made at different times or locations because the hole at the top of the left side bearing cap was not the same size as the right side one. I had to grind the right hole wider and grind down a cheap socket to get the strut shaft's nut fully tightened with the impact gun. Other than that, everything came together just like stock. The E30 and E36 M3 Bilstein Sport struts apparently have the same valving and they also have the same size spring perches; it all works beautifully.
With the tie-rods already disconnected earlier, the control arms' ball joints all unbolted easily (with the help of a fork and a hammer), accept the inner passenger side ball joint. It's a pain to get it on and off; short wrenches, a pry bar, and patience are required! The new '97 control arms have the same diameter rear shaft as the E30 ones; they fit right into the E30 control arm bushings. I had the offset polyurethane ones, and they just slid right in there. The same goes for the ball joint shafts, they all fit great.
FRONT BRAKES AND ABS:
The front brakes got the same treatment as the rear: lubing, assembling, torquing. The new discs went on with the set screws and the calipers followed with pads.
Later I sorted out the ABS sensor wiring for both front and rear. As of right now, the front E36 sensor is spliced into the E30 harness. The black E36 wire went to the black E30 wire. The yellow E36 wire went to the brown E30 wire. The brown E36 wire is left disconnected. I soldered it all and wrapped it up with heat shrink tubing, etc. The jackets on all the ABS sensors are pretty damn strong and slightly difficult to slit open, even with a sharp razor! The rear is still running off the original E30 sensors and wiring. The sensors are just spaced out, about the thickness of five copper crush gaskets. Before I did any of this finalizing on the wiring, my ABS was starting to engage at very odd times and the light would soon come on (which means the system is deactivated due to errors) and I could then brake as hard as I wanted to. Since finalizing the wiring as stated above, I have done one run with the car and the ABS light (Anti-Lock light) has not come on and the ABS unit has not engaged improperly. I will do more testing ASAP. If anything changes, I will add it here.
ABS UPDATE: I have yet to go back in and fix the wiring on the ABS sensors! Awhile back I was informed that the correct method to splice in the front E36 M3 sensors is to match the colors straight across and leave the extra wire out: black to black, brown to brown, yellow disconnected.
THE RESULTS:
Alignment within factory E30 specifications AND improved rear toe. Alignment sheet to come soon.